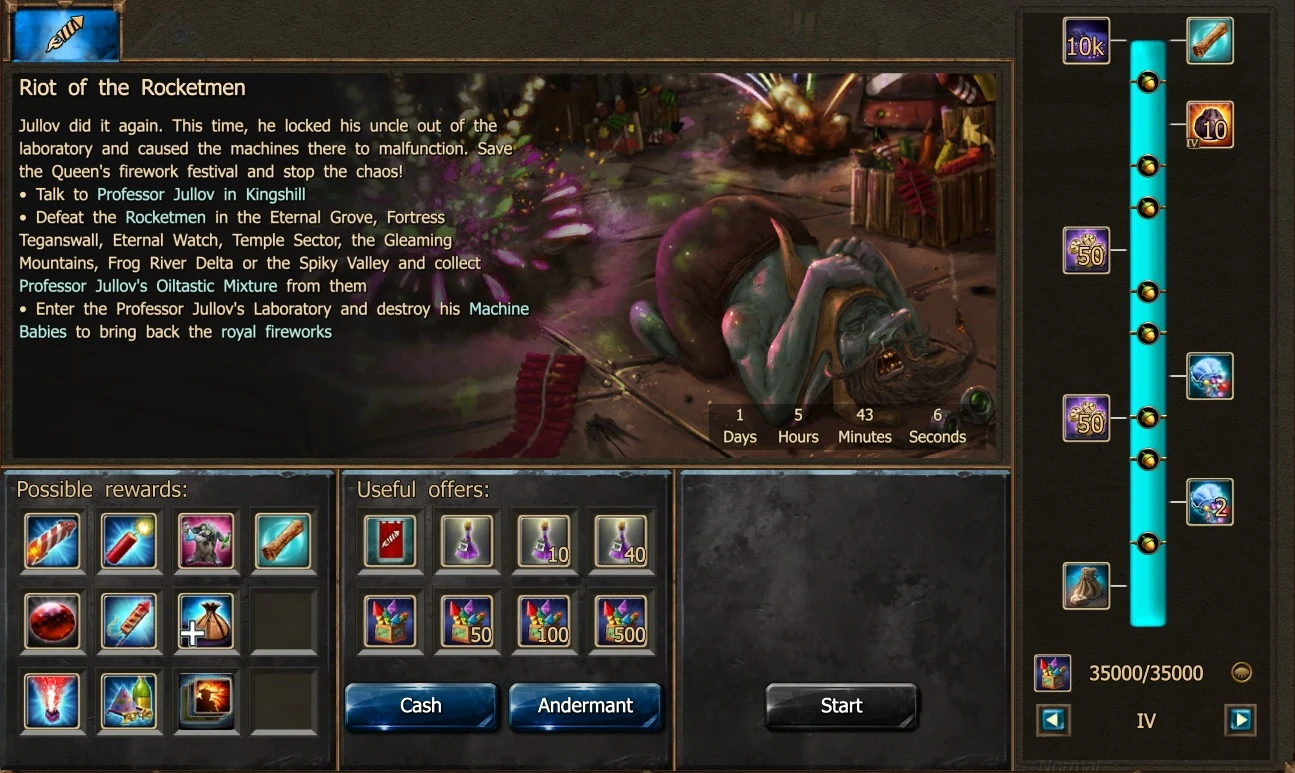
Level requirement: 20
Shop
| Item | Cost | Item | Cost | |||
|---|---|---|---|---|---|---|
| Royal Fireworks | 50x Royal Fireworks | |||||
| 100x Royal Fireworks | 500x Royal Fireworks | |||||
| Professor Jullov's Oiltastic Mixture | 10x Professor Jullov's Oiltastic Mixture | |||||
| 40x Professor Jullov's Oiltastic Mixture |
Quest
Progress

- 25
 Royal Fireworks = Mighty Spirit Guard x2
 - 50 Royal Fireworks = 10
- 75 Royal Fireworks = Essence of Vigor x499
- 100 Royal Fireworks = 10
- 125 Royal Fireworks = Realm Fragment x25
- 175 Royal Fireworks = 10
- 225 Royal Fireworks = Lockpick x20
- 275 Royal Fireworks = 10
- 325 Royal Fireworks = Extraordinary Equipment (T2) x5
- 375 Royal Fireworks = Vial of Werewolf Blood x2
- 425 Royal Fireworks = Secret Lairs' Offering x5
- 475 Royal Fireworks = 10
- 525 Royal Fireworks = Battery of Festival Fireworks
- 575 Royal Fireworks = 10
- 625 Royal Fireworks = Elixir of Vigor x5
- 625 Royal Fireworks = 10
- 750 Royal Fireworks = Elixir of Celerity x5
- 875 Royal Fireworks = 10
- 1000 Royal Fireworks = Festival Fireworks
- 1000 Royal Fireworks = 100

- 500 Royal Fireworks = Essence of Vigor x999
- 650 Royal Fireworks = 20
- 800 Royal Fireworks = Polished Gem Bag x5
- 950 Royal Fireworks = 20
- 1100 Royal Fireworks = Extraordinary Equipment (T2) x5
- 1350 Royal Fireworks = Lesser Rune Bag
- 1625 Royal Fireworks = 20
- 1800 Royal Fireworks = Advanced Physic of Vitality x5
- 2000 Royal Fireworks = Magical New Moon Scroll x2
- 2375 Royal Fireworks = 20
- 2750 Royal Fireworks = Ancient Wisdom x9999
- 3125 Royal Fireworks = 20
- 3500 Royal Fireworks = Honor Raise x5
- 5000 Royal Fireworks = 20
- 5375 Royal Fireworks = Impressive New Year's Fireworks
- 5750 Royal Fireworks = 20
- 6125 Royal Fireworks = Extraordinary Equipment (T2) x10
- 6125 Royal Fireworks = 20
- 6500 Royal Fireworks = Professor Jullov
- 6500 Royal Fireworks = 200

- 750 Royal Fireworks = Smelter (30 days)
- 1050 Royal Fireworks = 20
- 1350 Royal Fireworks = Essence of Vigor x2999
- 1650 Royal Fireworks = 20
- 1950 Royal Fireworks = New Years Bottle
- 2250 Royal Fireworks = 20
- 2550 Royal Fireworks = Radiant Gem Bag
- 2850 Royal Fireworks = 20
- 3150 Royal Fireworks = Lesser Rune Bag
- 3450 Royal Fireworks = 20
- 3750 Royal Fireworks = Essence of Vigor x999
- 4050 Royal Fireworks = Dracanian Rocket
- 4450 Royal Fireworks = 200
- 4650 Royal Fireworks = 20
- 4950 Royal Fireworks = Lockpick x100
- 5250 Royal Fireworks = 20
- 5550 Royal Fireworks = Inventory Expansion
- 5850 Royal Fireworks = 20
- 6150 Royal Fireworks = Legendary Equipment (T2) x5
- 6450 Royal Fireworks = 20
- 6750 Royal Fireworks = Hotkey Bar
- 7500 Royal Fireworks = Jewel of Amplified Healing
- 7500 Royal Fireworks = 500

- 2500 Royal Fireworks = Lesser Rune Bag
- 5000 Royal Fireworks = 50
- 7500 Royal Fireworks = Flawless Gem Bag x2
- 10000 Royal Fireworks = 50
- 12500 Royal Fireworks = Gilded Clover x50
- 12500 Royal Fireworks = 50
- 15000 Royal Fireworks = Royal Gem Bag
- 17500 Royal Fireworks = 50
- 20000 Royal Fireworks = 50
- 22500 Royal Fireworks = Gilded Clover x50
- 25000 Royal Fireworks = 50
- 27500 Royal Fireworks = 50
- 30000 Royal Fireworks = Legendary Equipment (T4) x10
- 32500 Royal Fireworks = 500
- 35000 Royal Fireworks = 10.000
- 35000 Royal Fireworks = Mysterious Scroll
Intro
Speak to Professor Jullov in Kingshill
Take the initial quest Hostile Acquisition
Collect 400x ![]() Gun Powder from Rocketmen in Scaling Normal Dungeons (see the list below)
Gun Powder from Rocketmen in Scaling Normal Dungeons (see the list below)
Collect a lot of ![]() Professor Jullov's Oiltastic Mixture in Scaling Normal Dungeons (see the list below)
Professor Jullov's Oiltastic Mixture in Scaling Normal Dungeons (see the list below)
Enter Professor Jullov's Laboratory and destroy the Four Machine Babies before they destroy the four crates.
Collect ![]() Royal Fireworks and fill up the progress bars before you pass out.
Royal Fireworks and fill up the progress bars before you pass out.
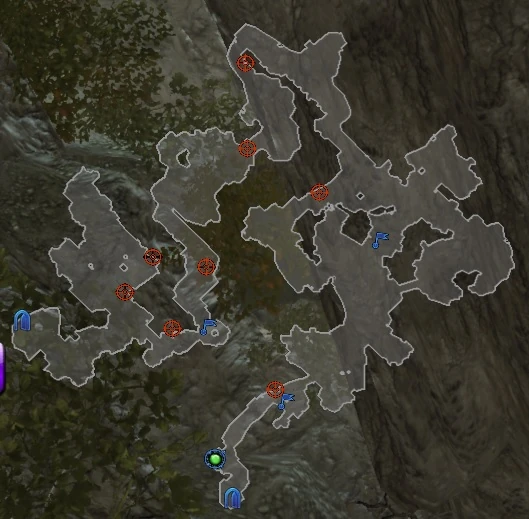
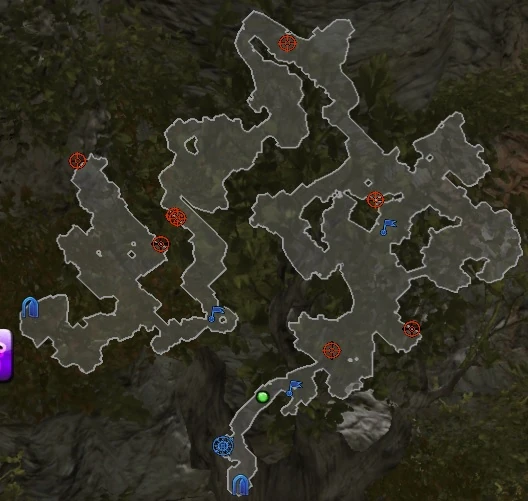
Farming Locations
Once you take the initial quest Hostile Acquisition from Professor Jullov in Kingshill you need to collect 400x ![]() Gun Powder in certain Dungeons. Those Dungeons are the same dungeons where you will need to collect
Gun Powder in certain Dungeons. Those Dungeons are the same dungeons where you will need to collect ![]() Professor Jullov's Oiltastic Mixture in order to access Professor Jullov's Laboratory after you complete the first part of the quest.
Professor Jullov's Oiltastic Mixture in order to access Professor Jullov's Laboratory after you complete the first part of the quest.
Dungeons
There are seven farming dungeons. Depending on your level, strength and preferences you can farm at any place you like on any difficulty.
- Eternal Grove
- Fortress Teganswall
- Eternal Watch
- Temple Sector
- The Gleaming Mountains
- Frog River Delta
- Spiky Valley
Once you enter a dungeon, Rocketmen will start spawning. They are spawning at different spots one by one. Each spot has a group of several Rocketmen.
There are always 8 spawning position in any dungeon, and these spawning locations are random (can be seen on the minimap). Their position can be always the same or it can always change patterns.
The spawning locations depend on 2 factors:
- your position on the map
- whether you are moving or not
If you are moving when you enter a dungeon they will start spawning at a most distant location from your position. The more you move through dungeon the more they change the next location away from you.
That means they would spawn at places you have already been.
However ... there is a trick. If you don't move when you enter a dungeon and wait for them to spawn at all places they will always spawn at same place depending from what entrance you are accessing the dungeon.
This is not working only in in two dungeons:
- Fortress Teganswall - when you enter via Teleport Stone or FBI or Burning Coast they can't be seen on the minimap so you need to move around. If you access through Tegan's Sanctuary or Dragon Caverns and you stay still, they will always spawn at same place.
- Temple Sector - they are never showing up on minimap so you always need to move, no matter from what entrance you came in. Avoid this dungeon.
Note: this behavior has been only tried during solo play. It is not tested in group play.
Below are shown few patterns per dungeon (don't rely on them they may change).
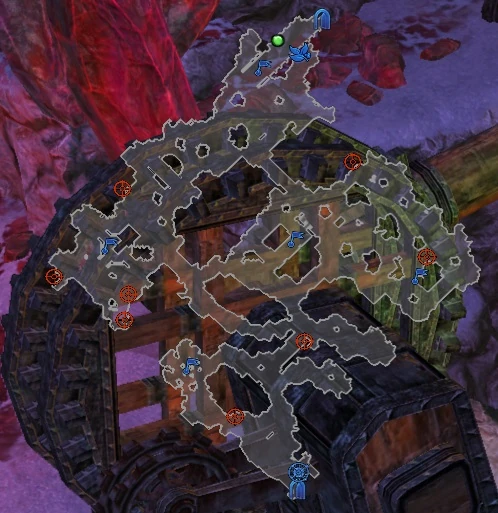
Eternal Grove
Fortress Teganswall

Enter via Tegan's Sanctuary or Dragon Caverns and farm the nearby groups, then reset the map.
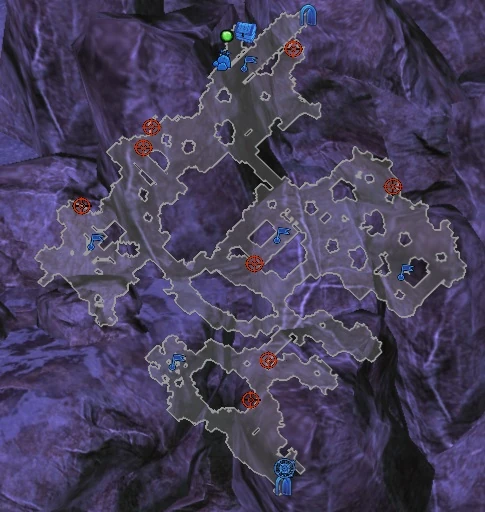
Eternal Watch
Temple Sector


Avoid this dungeon.
The Gleaming Mountains

Frog River Delta

Spiky Valley

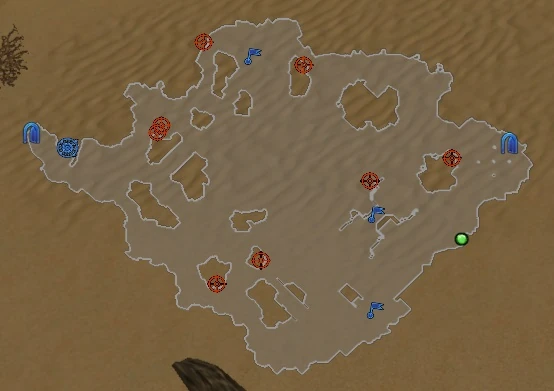

Enter via Treasure Cave and start counterclockwise.
My recommendation would be:
- Fortress Teganswall accessed via Tegan's Sanctuary or Dragon Caverns - only the nearby groups then reset the map.
- Spiky Valley accessed via Treasure Cave - it is relatively small dungeon and can be cleared fast.
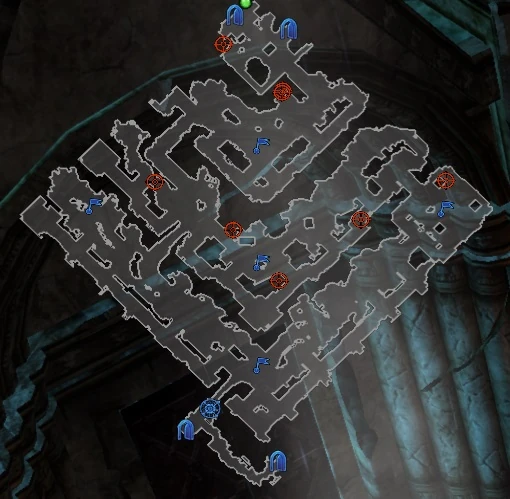
Professor Jullov's Laboratory
| Professor Jullov's Laboratory | |
|---|---|
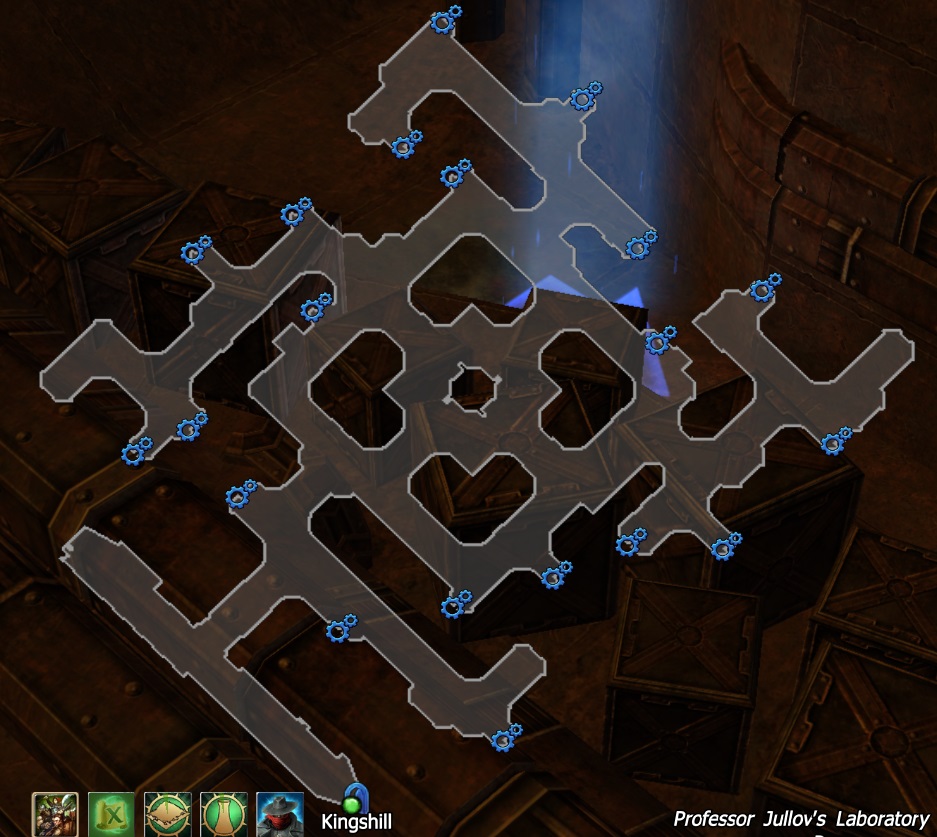
| |
| Basic Info | |
| Type | Dungeon |
| Event | Riot of the Rocketmen |
| Monster Levels | 20-55 |
| Level Requirement | 20 |
| Entry Requirement | 24x 140x |
| Nearest Urban Area | Kingshill |

Once you are done with the second part of the Hostile Acquisition quest, make sure you have enough ![]() Professor Jullov's Oiltastic Mixture before proceeding to the final part of the quest, because you will get
Professor Jullov's Oiltastic Mixture before proceeding to the final part of the quest, because you will get ![]()
![]() Riot of the Rocketmen Attire (3 Hours). Alternatively you can re-take the quest until you are ready.
Riot of the Rocketmen Attire (3 Hours). Alternatively you can re-take the quest until you are ready.
Those who have gotten the ![]() Riot of the Rocketmen Attire from the Rocketman Chest during Winter Solstice Festival 2019, can use it immediately.
Riot of the Rocketmen Attire from the Rocketman Chest during Winter Solstice Festival 2019, can use it immediately.
Note: Attires are working with quests as well.
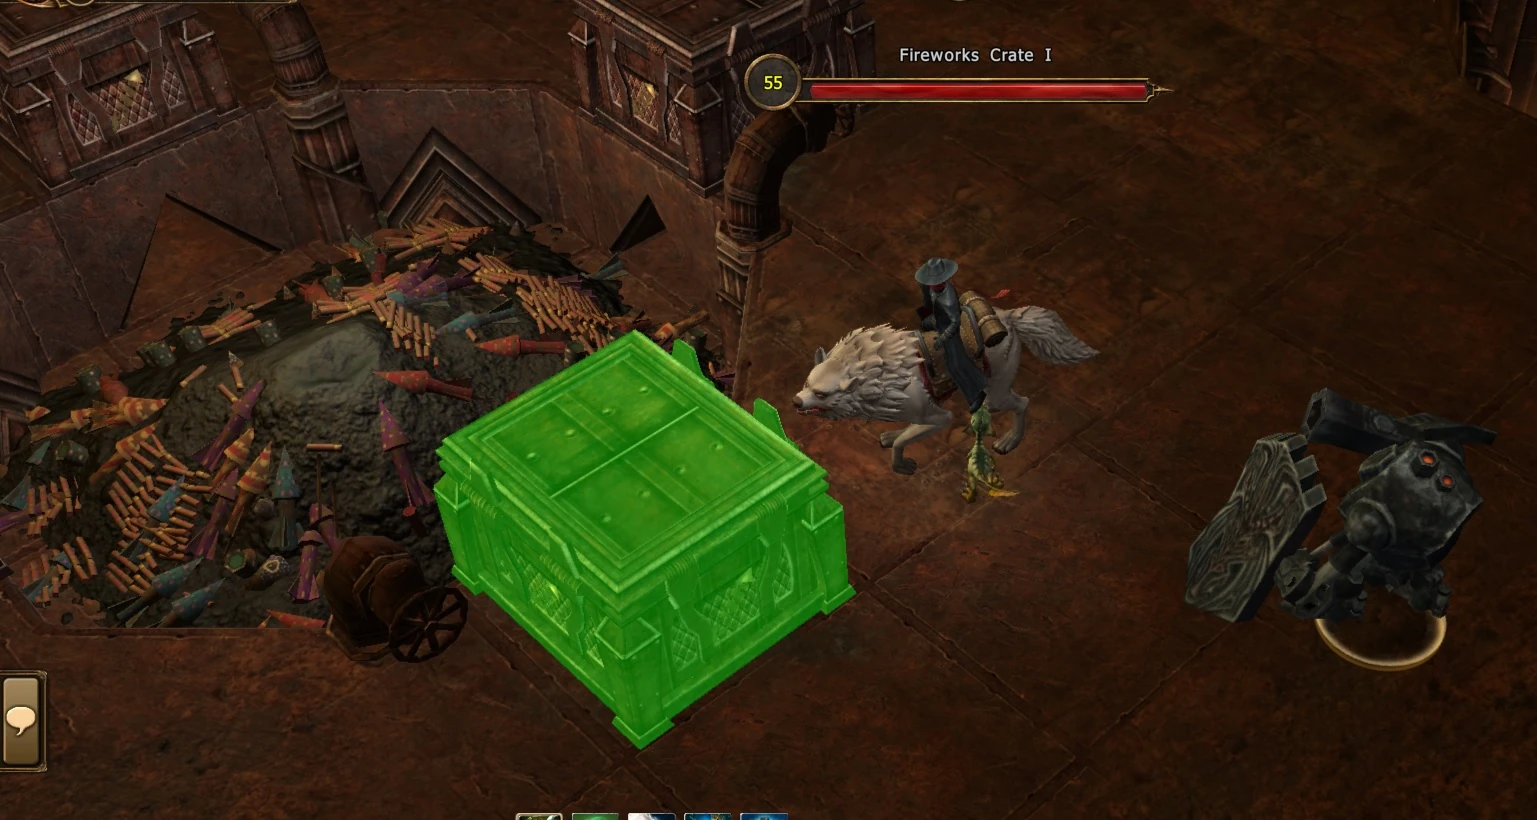
The goal is to destroy all four Machine Babies before they destroy all four crates in the center of the map.
If the crates are destroyed you can only take progress and loot from the Pile. You can get extra progress from each saved crate.
Machine Babies will start producing bombs 30 seconds after you cross the entrance line. From that moment on, depending on the number of players in the group they will start activating one after another with a certain time delay in between. If you destroy Machine Baby the next one will be activated immediately.
| 1 Player | 2 Players | 3 Players | 4 Players | 5 Players | |
|---|---|---|---|---|---|
| Machine Baby 1 | 30 | 30 | 30 | 30 | 30 |
| Machine Baby 2 | 210 | 150 | 120 | 90 | 35 |
| Machine Baby 3 | 390 | 330 | 300 | 270 | 40 |
| Machine Baby 4 | 580 | 520 | 490 | 460 | 45 |
Machine (hasta la vista) Baby is producing mobs with "Terminator"-like names - Bomb-inator and Justice Grant-inator.
The bombs and producing machines are having mechanics like the mechanics in Caverns of the Eternal Storm. Your equipment is useless against them. You will always deal low damage per hit no matter what equipment you are using. That means all players are equal no matter how much damage they have, they will deal same low damage until they fall asleep.
Only your skills matter, meaning rangers are screwed.
Your damage will be almost the same if you are suing 2H weapon or not using any weapon at all. In example: If you are playing a Spellweaver and using 2H weapon, and you deal 265 damage per hit with Magic Missile ... when you remove the weapon your damage will be almost the same (261-2)
That means you will need Travel Speed and Attack Speed as much as possible.
Personally , I will be playing with the old Bow of the End of Time.
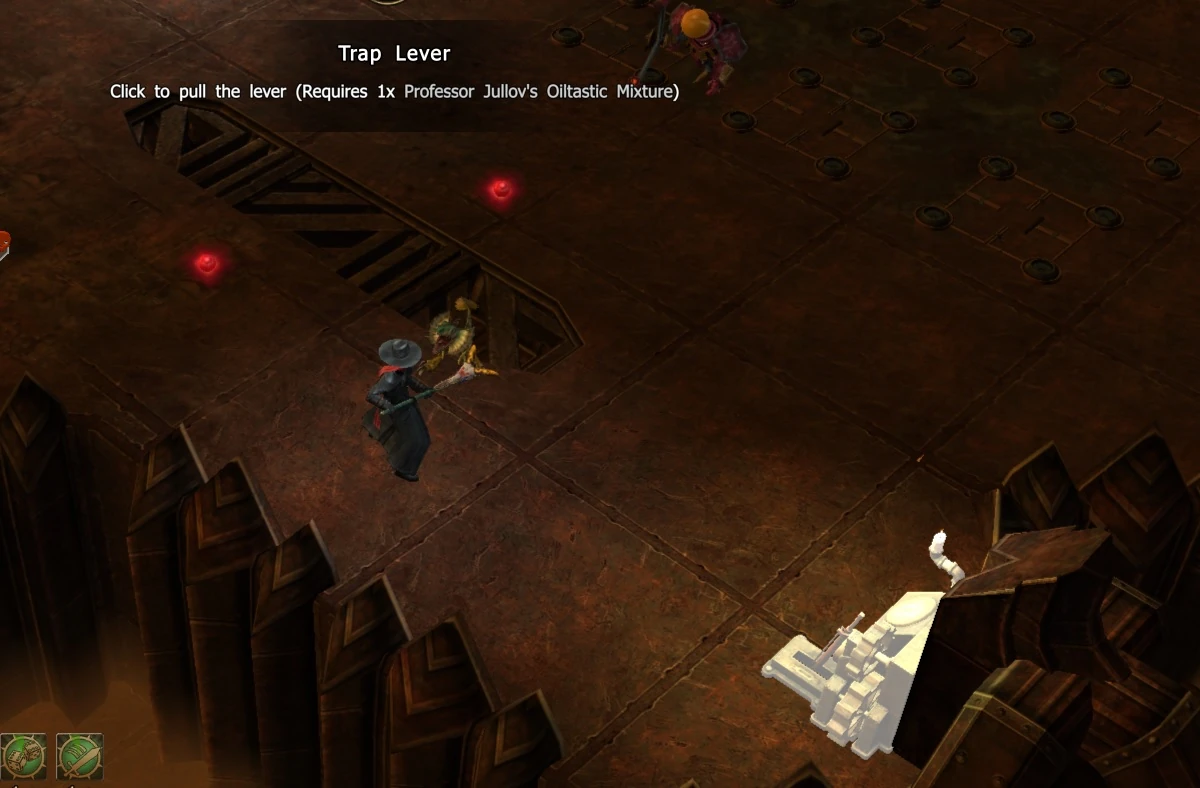
There are Trap Levers that you can activate, but I would not recommend you spending ![]() Professor Jullov's Oiltastic Mixture on them. The traps are like damaging the bombs and slowing them down.
Professor Jullov's Oiltastic Mixture on them. The traps are like damaging the bombs and slowing them down.
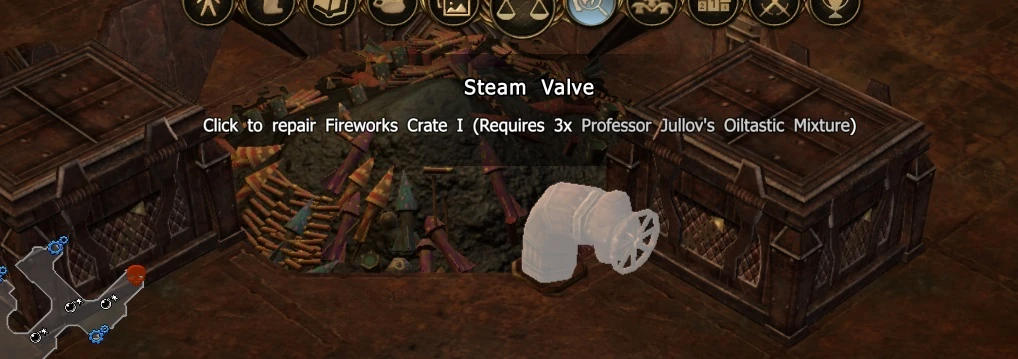
If a Crate is badly damaged you can use 3x ![]() Professor Jullov's Oiltastic Mixture on Steam Valve and repair the Crate (only once per crate).
Professor Jullov's Oiltastic Mixture on Steam Valve and repair the Crate (only once per crate).
Don't forget to take the RE quest and finish it every 5th run (stay longer and kill rocketmen if necessary). That way you will get 1000x ![]() Royal Fireworks and 50x
Royal Fireworks and 50x ![]() every four runs (on top of the progress and loot from the crates and the pile).
every four runs (on top of the progress and loot from the crates and the pile).
| Difficulty | Crate | Pile |
|---|---|---|
| Normal | 7 | 25 |
| Painful | 13 | 50 |
| Excruciating | 19 | 75 |
| Fatal | 25 | 100 |
| Infernal I | 38 | 150 |
| Infernal II | 50 | 200 |
| Infernal III | 63 | 250 |
| Infernal IV | 125 | 500 |
- Crate - displayed progress drop per single crate